How to Clean Distributor Cap: Symptoms And How to Avoid Them?
The distributor cap is an important part of the engine in your car. It helps to distribute the spark to the plugs, and if it gets dirty, it can cause all sorts of problems. Symptoms of a dirty distributor cap include misfiring, hard starting, and stalling.
If you’re having these issues, it’s time to clean your distributor cap.
- Remove the distributor cap from the vehicle
- Inspect the distributor cap for any cracks or damage
- Clean the inside of the distributor cap with a clean cloth or brush
- Inspect the rotor for any damage or wear
- If necessary, replace the distributor cap and rotor
DISTRIBUTOR CAP CLEANING
What Can I Use to Clean My Distributor Cap?
If your distributor cap is looking a little dirty, you can clean it with some simple household cleaners. All you need is a rag, some soap and water, and a little bit of elbow grease. Just be sure to avoid using any harsh chemicals or abrasives, as these can damage the delicate parts inside the distributor cap.
Once you’ve got your supplies gathered, simply wet the rag with soapy water and give the distributor cap a good wipe-down. If there’s any stubborn dirt or grime build-up, you can use an old toothbrush to gently scrub it away. Once you’re satisfied that the distributor cap is clean, rinse it off with some clean water and dry it thoroughly before putting it back on your car.
And that’s all there is to cleaning a dirty distributor cap! With just a few minutes and some basic household supplies, you can keep your car’s ignition system running smoothly for years to come.
How Do You Know If Your Distributor Cap is Bad?
If your distributor cap is bad, it will usually show signs of wear and tear. The most common symptom of a bad distributor cap is if the engine starts to misfire or run rough. This can be caused by the contact points between the rotor and the spark plug wires wearing out.
If you notice this happening, it’s time to replace your distributor cap.
What Makes Distributor Cap Go Bad?
One of the most common causes of distributor cap failure is simply age and wear. Over time, the material that makes up the distributor cap can break down, causing cracks and other damage. This damage can allow moisture and other contaminants to enter the distributor, which can lead to corrosion and other problems.
Another common cause of distributor cap failure is improper installation. If the distributor cap is not installed correctly, it can become loose over time and eventually fall off entirely. This can obviously lead to serious engine problems.
Finally, a failed distributor cap can also be caused by an electrical problem. If there is a short circuit or some other issue with the electrical system, it can cause damage to the distributor cap.
How Do You Fix a Distributor Cap?
Assuming you are referring to an ignition distributor cap, the process is as follows:
1. Disconnect the negative battery cable.
2. Remove the distributor cap and rotor.
Inspect the rotor for wear or damage and replace if necessary.
3. Clean the inside of the distributor cap with a solvent-soaked rag. Allow it to dry completely before proceeding.
4. Install the new rotor, making sure it is properly aligned with the spark plug terminals.
5.Install the new distributor cap, again making sure all terminal are properly aligned.

Credit: rxmechanic.com
White Corrosion on Distributor Cap
What is White Corrosion on a Distributor Cap?
White corrosion on a distributor cap is a sign that the cap needs to be replaced. The white corrosion is caused by moisture and dirt build-up, which can cause the electrical connections to corrode.
If left unchecked, this corrosion can lead to engine misfires and other issues.
How do you Prevent White Corrosion on a Distributor Cap?
To prevent white corrosion on a distributor cap, it’s important to keep the area around the cap clean and dry.
You should also inspect the cap regularly for any signs of corrosion. If you notice any corrosion, promptly replace the distributor cap.
Wd40 in Distributor Cap
If you have ever experienced a misfire in your engine, or if your car has trouble starting on cold mornings, you may be wondering if there is anything you can do to prevent these issues. One potential solution is to use WD-40 in your distributor cap.
WD-40 is a water displacing formula that can help to keep moisture out of your distributor cap.
This can be especially helpful in preventing corrosion and rust inside the cap, which can lead to misfires. To use WD-40 in your distributor cap, simply remove the cap and spray a light coat of WD-40 onto the inner surface. Allow it to dry completely before reinstalling the cap.
You should also take care to regularly inspect your distributor cap for any signs of damage or wear. If you notice any cracks or other damage, it’s important to replace the cap as soon as possible to avoid further issues.
How to Test for a Bad Distributor Cap
A bad distributor cap can cause all sorts of engine performance issues, from misfires to hard starting. If you suspect your distributor cap is going bad, there are a few tests you can perform to confirm it.
First, check the condition of the rotor.
If it’s cracked or damaged in any way, that’s a sure sign the cap needs to be replaced.
Next, remove the cap and inspect the terminals for corrosion or damage. If they’re corroded or damaged, that’s another sign that it’s time for a new cap.
Finally, test the resistance of the terminal contacts with an ohmmeter. If there’s high resistance, that means there’s a poor connection between the terminal and contact point, which can lead to engine performance issues.
If you find any of these problems with your distributor cap, it’s best to replace it as soon as possible to avoid engine problems down the road.
Cleaning Distributor Rotor
Assuming you are talking about an automotive distributor rotor:
The distributor rotor is a small, round piece that sits atop the distributor cap. It spins along with the engine and sends out sparks to the spark plugs via the spark plug wires.
Over time, these parts can become caked with oil, dirt, and other debris, which can prevent them from working properly. That’s why it’s important to clean your distributor rotor on a regular basis.
To clean your distributor rotor, first remove it from the vehicle.
You can do this by disconnecting the negative terminal of your battery, then unscrewing the retaining screw and pulling off the cap (make sure you keep track of which way it faces so you can put it back on correctly). Once the cap is off, you should be able to see the rotor. Use a brush or rag to wipe away any visible debris, then use compressed air to blow out any remaining dirt or grime.
Be sure to clean both sides of the rotor.
Once you’ve cleaned off the rotor, put everything back together in reverse order and reconnect the negative terminal of your battery. Your vehicle should now be ready to run smoothly!
Bad Distributor Cap Symptoms
If your distributor cap is going bad, you may notice one or more of the following symptoms:
1. Your engine will misfire. This can happen when one or more of the spark plugs are not firing correctly.
2. You may notice a decrease in fuel efficiency.
3. Your engine may run Rough. This can be caused by the spark plugs not firing correctly or by a loss of compression in the cylinders.
4. You may see an increase in exhaust emissions.
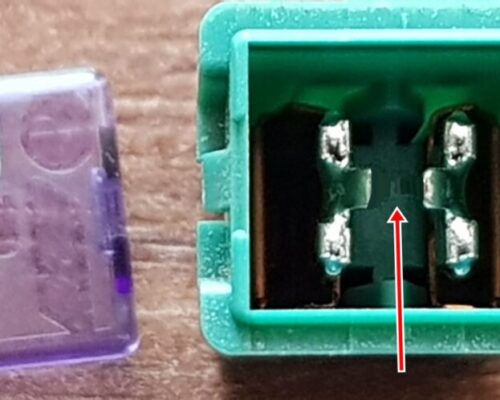
Green Corrosion Inside Distributor Cap
The distributor cap on your car is what provides the spark that ignites the fuel in your engine. Over time, this cap can become corroded, which can lead to a loss of power and eventually engine failure.
If you notice that your car’s distributor cap is starting to show signs of green corrosion, it’s important to take action immediately.
This type of corrosion is caused by a build-up of moisture and dirt, and it can quickly destroy the electrical connections inside the cap.
To clean off green corrosion from your distributor cap, you’ll need to remove it from the engine and use a wire brush to scrub away the buildup. Once you’ve removed all of the corrosion, be sure to dry off the cap completely before reinstalling it.
If you don’t feel comfortable cleaning off the corrosion yourself, you can always take it to a mechanic or auto body shop for help. Just be sure to get it fixed as soon as possible so that your car can continue running smoothly.
Can a Distributor Be Cleaned
Assuming you are referring to a fuel distributor, the answer is yes it can be cleaned. Over time, your fuel distributor can become clogged with dirt and debris which can lead to lower performance and fuel efficiency. However, by regularly cleaning your distributor you can help keep it functioning properly.
To clean your distributor, you will need to remove it from your vehicle and disassemble it. Once disassembled, you can clean each component with a mixture of soap and water. Be sure to rinse all the parts thoroughly before reassembling the distributor and reinstalling it on your vehicle.
Symptoms of Bad Distributor Timing
If your car’s distributor timing is off, it can cause a number of problems. The most common symptom is engine ping. This is when the engine makes a knocking noise that usually goes away when you acceleration.
Other symptoms include:
– decreased fuel economy
– loss of power
– rough idle
– stalling
If you suspect that your distributor timing is off, the best thing to do is take it to a mechanic and have them check it out.
Conclusion
The distributor cap is responsible for providing the spark that ignites the air/fuel mixture in the cylinders. Over time, the distributor cap can become coated with oil, dirt and other debris, which can cause it to function less effectively. In some cases, this can lead to engine misfires and poor fuel economy.
There are a few symptoms that may indicate your distributor cap needs to be cleaned:
– Your engine is running rough or misfiring
– You’ve noticed a decrease in fuel economy
– Your “check engine” light is on
If you suspect your distributor cap needs to be cleaned, you can do so using a simple cleaning solution and a soft bristle brush. First, remove the distributor cap from the engine and carefully clean away any dirt or debris from the surface.
Next, soak the cap in a cleaning solution for several minutes before rinsing it off with water. Once dry, reinstall the distributor cap and test drive your vehicle to see if there’s any improvement in performance.