How To Fix License Plate Light Wiring?
If your license plate lights are out, it’s likely because the wiring is loose or needs to be replaced. Here’s how to fix license plate light wiring in a few simple steps.
First, check the fuse box for a blown fuse.
If the fuse is good, then the next step is to check the bulbs. If the bulbs are burned out, replace them with new ones.
Next, check the wires that connect the bulbs to the power source.
If they are loose, tighten them up with a wrench or pliers.
If the wires are frayed or broken, you will need to cut them off and strip away the insulation around 1/2 inch from each end of the wire using a wire stripper tool. Then twist each wire around a connector (or use electrical tape) and re-connect them to their respective power source and bulb socket.
- If your license plate light is not working, first check to see if the bulbs are burned out
- If the bulbs are fine, then check the fuse box to see if the fuse for the license plate lights has blown
- If the fuse is fine, then check the wiring harness to see if any of the wires are loose or damaged
- If all of those things check out, then you may need to replace the license plate light assembly itself
TROUBLESHOOTING LICENCE PLATE LIGHT CIRCUIT. Any vehicle. Fixed!
How Do You Wire a Number Plate Light?
Number plate lights are an important safety feature on any vehicle. They help other drivers see your car’s registration plate, even at night or in low light conditions. But if your number plate lights are not working, it can be a serious safety hazard.
There are two ways to wire number plate lights – with the power coming directly from the battery, or from the headlight switch. If you’re not sure which method your car uses, it’s best to check the wiring diagram for your specific model.
Wiring number plate lights directly to the battery is the simplest way to do it.
All you need is a length of automotive cable and some basic tools. Just run the cable from the positive terminal of the battery, through a hole in the firewall (if there is one), and to each of the number plate light bulbs. Make sure you use enough cable so that there is no chance of it being pulled out by accident.
If your car has its number plate lights wired through the headlight switch, things are a little more complicated. You will need to connect one end of your automotive cable to a constant 12 volt power source – this could be either side of the fuse box or direct to the battery itself.
How Do You Wire a Lighted License Plate Frame?
Assuming you have a basic understanding of wiring and electricity, wiring a lighted license plate frame is not difficult. The most important thing to remember is to connect the wires to the proper terminals on the frame. Here is a step-by-step guide to wiring a lighted license plate frame:
1. Begin by disconnecting the battery. This will prevent any electrical shocks while you are working on the project.
2. Next, remove the screws that hold the license plate in place.
In most cases, there will be four screws holding the plate in place.
3. With the screws removed, gently pull the plate away from the vehicle so that you can access the back side of it.
4. On the back side of the license plate, locate the two wire leads coming from the lights on either side of the frame.
There may also be a third wire lead coming from a brake light or turn signal located above or below the license plate lights.
5. Using a pair of pliers, twist each wire lead clockwise until it comes loose from its terminal (this may require some force). Once all three wires are disconnected, set them aside for now.
Where is the Fuse for License Plate Lights?
If your license plate lights are out, it’s likely because a fuse has blown. To find the fuse for your license plate lights:
1. Open the hood of your car and locate the fuse box.
This is usually found near the battery.
2. Once you’ve found the fuse box, look for a label that indicates which fuse controls the license plate lights.
3. If there is no label, consult your car’s owners manual to find out which fuse controls the license plate lights.
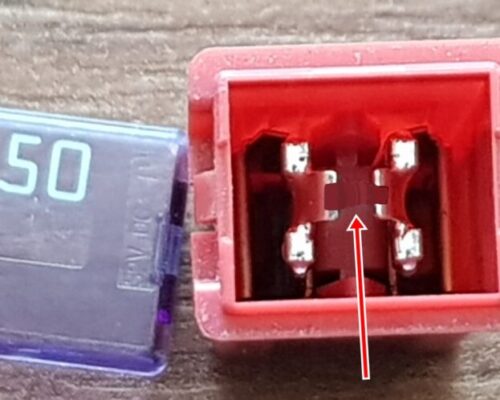
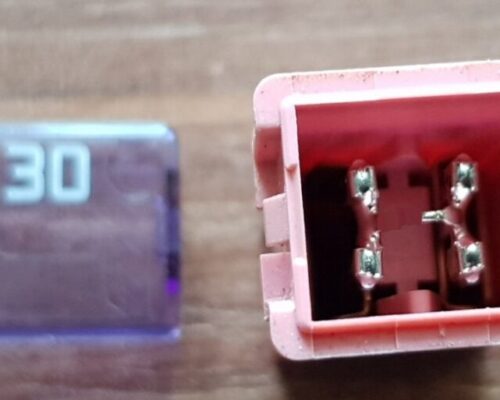
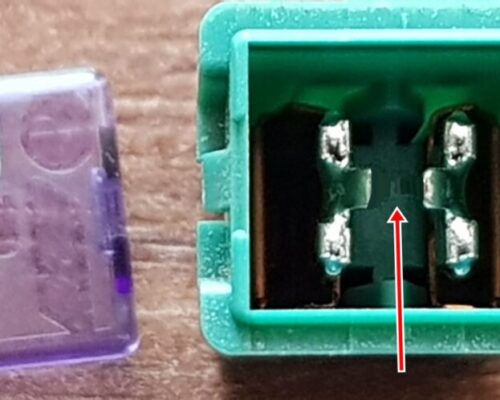
4. Once you’ve located the correct fuse, use a test light or multimeter to check if it is blown. If it is, replace it with a new one of the same amperage rating.
Why Wont My Tag Lights Work?
If your tag lights are not working, there are a few things that could be the issue. The first thing to check is the bulbs themselves. Make sure they are properly screwed in and that the filaments are not burned out.
If they appear to be fine, then the next step is to check the fuses. There should be a fuse specifically for the tag lights – if this is blown, it will need to be replaced. If neither of these solutions work, then it is likely that there is an issue with the wiring itself.
This will need to be inspected and repaired by a qualified mechanic or electrician.

Credit: www.pinterest.com
Which Fuse is for the License Plate Lights
There’s nothing quite as frustrating as getting into your car at night, only to realize that your license plate lights are out. If this happens to you, don’t panic – there’s an easy fix. All you need to do is locate the fuse that controls the license plate lights and replace it with a new one.
To find the fuse, consult your car’s owner’s manual or look for a diagram on the inside of the fuse box cover. Once you’ve found it, simply remove the old fuse and insert a new one of the same amperage. That’s all there is to it!
If you’re not comfortable working with electrical components in your car, no worries – just take it to a qualified mechanic and they’ll take care of it for you.
License Plate Light Not Working After Bulb Change
If your license plate light isn’t working after you’ve changed the bulb, there are a few things that could be going on. First, make sure that the new bulb is properly seated in the socket and screwed in tight. Next, check to see if the fuse for the license plate lights has blown.
If it has, replace it with a new one. Finally, if neither of those solutions work, there may be a problem with the wiring leading to the license plate light. In that case, you’ll need to consult a professional mechanic or electrician to get to the bottom of the issue.
One Number Plate Light Not Working
If one of your car’s number plate lights isn’t working, there are a few things you can check before taking it to a mechanic. First, make sure the light bulb is securely in its socket and not burned out. If the bulb looks fine, then check the fuse for the license plate lights.
If the fuse is blown, replacing it should fix the problem.
If neither of those solutions works, then there may be a problem with the wiring leading to the light. This is something that will need to be checked by a mechanic or auto electrician.
In most cases, they’ll be able to quickly diagnose and repair any issues with the wiring.
How to Wire a License Plate Light on a Trailer
If you’re looking to wire a license plate light on your trailer, there are a few things you need to know. For one, the process is relatively simple and only requires a few tools. Secondly, there are a few different ways to go about it, so make sure you select the method that works best for your particular setup.
And lastly, always make safety your top priority when working with electrical wiring.
With that said, let’s take a look at how to wire a license plate light on a trailer step by step:
1. Start by disconnecting the negative battery terminal on your vehicle.
This will help prevent any accidental electrocution while working with the wiring.
2. Next, locate the wires that power the license plate light on your trailer. If they’re not labeled, use a multimeter to test for continuity between the two terminals.
Once you’ve found the right wires, use wire strippers to remove about 1/2 inch of insulation from each one.
3. Now it’s time to connect the wires from your trailer’s license plate light to those of your vehicle’s taillight assembly. If you’re using butt connectors, simply slide them over each stripped wire end and then twist or crimp them closed until tight.
Alternatively, you can also solder the connection points for an even more secure bond between the wires (just be sure not to melt any surrounding plastic). Finally, wrap all exposed connections with electrical tape or heat shrink tubing for added protection against moisture and corrosion.
Tail Lights And License Plate Lights Not Working
If your tail lights and license plate lights are not working, there are a few things you can check to try to diagnose the issue. First, make sure that the bulbs are properly installed and screwed in tight. Next, check the fuse box to see if a fuse has blown.
If neither of these solutions work, you may need to take your car to a mechanic or an auto electrician to figure out the problem.
Trailblazer License Plate Light Not Working
We all know how important it is to have working headlights on our vehicles. Not only for our safety, but for the safety of others on the road as well. So what do you do when your Trailblazer’s license plate light isn’t working?
First, check to see if the fuse has blown. The fuse box is usually located under the hood, and the owner’s manual will have a diagram to show you which one controls the license plate light. If the fuse is blown, replace it with a new one of the same amperage.
If the fuse isn’t blown, then there may be a problem with the bulbs themselves. Start by checking to see if both bulbs are burned out. If they are, then simply replace them with new ones.
But if only one bulb is burned out, then there could be an issue with the socket itself. Try cleaning it out with some electrical contact cleaner and then reinserting the bulb. If that doesn’t work, you may need to replace the entire socket assembly.
Hopefully this info helps get your Trailblazer’s license plate light up and running again!
Ford F150 License Plate Lights Not Working
If your Ford F-150’s license plate lights are not working, there are a few things that could be the culprit. First, check to see if the bulbs are burned out. If they are, simply replace them with new ones.
If the bulbs aren’t burned out, then it’s possible that there is a problem with the wiring. Inspect the wiring to see if there are any frayed or broken wires. If you find any damaged wires, you’ll need to repair or replace them.
Finally, if neither of these solutions solves the problem, it’s possible that there is an issue with the fuse for the license plate lights. Check your vehicle’s fuse box to see if this is the case and replace the fuse as needed.
Conclusion
If your license plate light is out, there are a few things you can check to see if the issue is with the wiring. First, make sure that the fuse for the license plate light is not blown. If it is, replace it with a new one.
Next, check to see if there is power going to the license plate light socket by using a multimeter. If there is no power, the issue may be with a wire that has come loose or been damaged. To fix this, locate the wire and reconnect it or replace it with a new one.
Finally, test the license plate light to see if it is working properly.